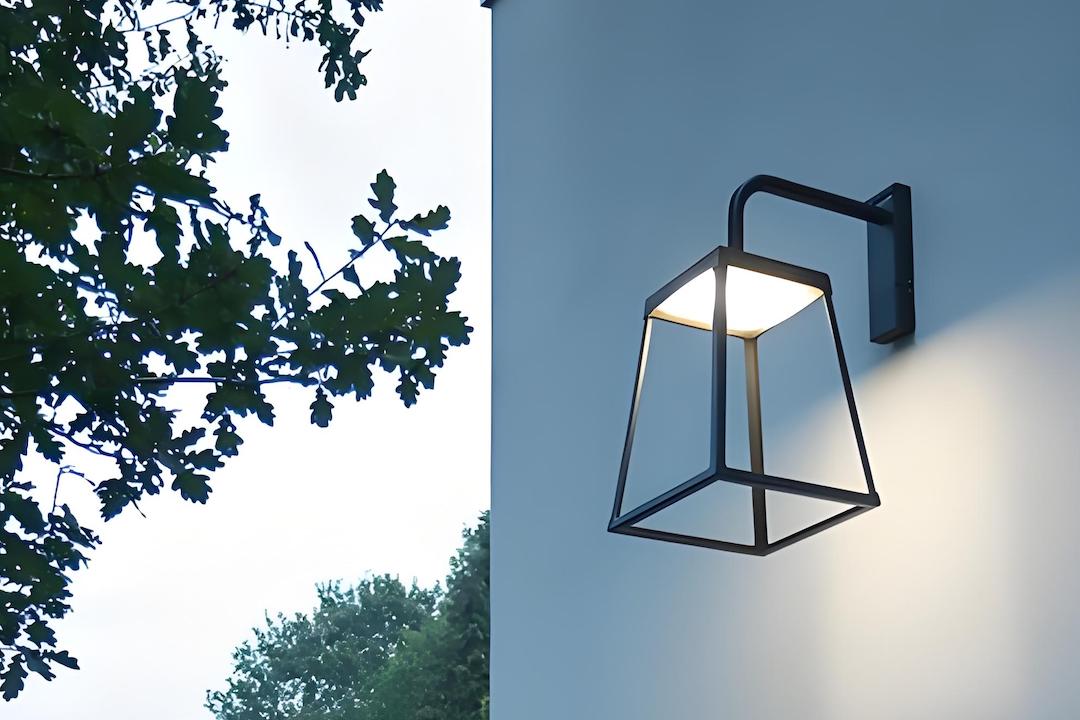
Upgrade Your Front Porch with a Waterproof Outdoor Wall Lantern
So, you’re thinking about beefing up your front porch with a new outdoor wall lantern? Smart move. Not only can a good lantern brighten up your entry and make it more welcoming, but a waterproof one is essential for standing up to the elements. Let’s dive into what you need to know to pick the right one and get it installed.
Your front porch is the first impression visitors get of your home. A well-lit porch isn’t just about aesthetics; it’s about safety and security too. And when it comes to outdoor lighting Buyance, water resistance isn’t a luxury, it’s a necessity.
More Than Just Light: The Practical Benefits
Enhancing Curb Appeal
Let’s be honest, a dim or non-existent porch light can make your house look a little uninviting, especially after dark. A stylish, well-placed lantern can instantly elevate the look of your home’s exterior. It’s like a welcoming smile for your house.
Boosting Safety and Security
Think about fumbling for your keys in the dark, or that uneasy feeling when you can’t quite see who’s at the door. A good outdoor light makes navigating your porch safer for everyone, from residents to guests. It also acts as a deterrent to potential intruders by eliminating dark hiding spots.
Extending Usable Outdoor Space
Even if your porch isn’t a place you often sit, having it well-lit can make it feel more connected to your home and usable for short periods, like bringing in groceries or greeting guests. A brighter porch can make stepping outside after dusk feel less like venturing into the unknown.
The “Waterproof” Factor: Why It Matters
Battling the Elements
Rain, snow, sleet, humidity – your outdoor lights are constantly exposed to moisture. Without proper sealing and construction, water can seep into the electrical components, leading to corrosion, short circuits, and ultimately, a dead lantern. This can be a real headache and an unnecessary expense.
Longevity and Durability
A lantern specifically designed to be waterproof will be made with materials that resist rust and corrosion. Think about materials like brass, aluminum, or specially treated steel. These are chosen for their ability to withstand exposure to the elements without degrading quickly. A quality waterproof fixture will look good and function correctly for years to come.
Preventing Electrical Hazards
Moisture and electricity are a dangerous mix. A poorly sealed fixture can become a safety hazard, posing a risk of electric shock. Waterproofing is a critical safety feature that protects both the fixture and the people around it.
What to Look for in a Waterproof Outdoor Wall Lantern
Picking the right lantern involves considering a few key features beyond just how it looks. This is where you get into the nitty-gritty.
Material Matters: The Backbone of Durability
The materials used in your lantern’s construction are arguably the most important factor in its longevity, especially when it comes to water resistance.
Die-Cast Aluminum: A Solid Choice
Die-cast aluminum is a popular choice for outdoor fixtures. It’s lightweight, naturally rust-resistant, and can be molded into intricate designs. It holds up well against moisture and doesn’t corrode like cheaper metals can.
Solid Brass: The Premium Option
Solid brass is another excellent material for outdoor lighting. It’s known for its exceptional corrosion resistance and develops a beautiful patina over time rather than rusting or flaking. While it’s a more expensive option, it’s a long-term investment in quality.
Stainless Steel: Sleek and Strong
High-quality stainless steel can also be a good choice, but you need to be careful. Not all stainless steel is created equal; some can still be prone to rust in harsh coastal environments. Look for marine-grade stainless steel if you’re in a saltwater area.
Coated Steel and Iron: Proceed with Caution
While some steel and iron fixtures are coated to prevent rust, these coatings can chip or scratch over time, exposing the metal to moisture. If you go this route, ensure the coating is robust and check for any imperfections before buying.
IP Ratings: Understanding the “Waterproof” Seal
You’ll often see “IP ratings” associated with outdoor electrical products. This is a standardized way to tell you how well something is protected against solids ( like dust) and liquids.
What Do IP Ratings Mean?
IP stands for “Ingress Protection.” The rating consists of two digits. The first digit indicates protection against solid objects, and the second indicates protection against liquids. For outdoor lighting, you’re primarily concerned with the second digit.
Finding the Right Rating for Your Porch
For general outdoor wall lanterns, you’ll typically want to see an IP rating of at least IP44.
- IP44: Protected against objects larger than 1mm (like wires) and splashing water from any direction. This is generally sufficient for most sheltered porches.
However, if your porch is more exposed to direct rain or harsh weather, consider a higher rating:
- IP65: Dust-tight and protected against water jets – meaning it can withstand a strong stream of water.
- IP66: Dust-tight and protected against powerful water jets.
- IP67: Dust-tight and protected against immersion in water up to 1 meter for 30 minutes. (Likely overkill for most wall lanterns, but it tells you something about the sealing).
When in doubt, aim a little higher. A higher IP rating generally means better protection and a longer lifespan.
Style and Design: Matching Your Home’s Aesthetic
While waterproofing and material are crucial for longevity, the style of the lantern is what makes it fit your home.
Traditional and Classic Lanterns
These often mimic the look of gas or oil lanterns with clear or seeded glass shades, often in black, bronze, or brushed nickel finishes. They work well with older homes or those with a more classic architectural style.
Modern and Contemporary Designs
Think clean lines, geometric shapes, and often minimalist designs. Materials like brushed metal, clear glass, or even frosted acrylic are common. These fit well with newer homes or those with a sleeker aesthetic.
Transitional Styles
These bridge the gap between traditional and modern, offering a more versatile look that can adapt to various home styles. They might feature a blend of classic shapes with updated materials or finishes.
Rustic and Farmhouse Vibes
Look for lanterns with textured finishes, natural materials (or finishes that mimic them), and perhaps a slightly distressed look. Think iron, dark bronze, or even wood accents.
Light Source Considerations: LED is King
The type of bulb or light source you choose has a significant impact on energy efficiency, lifespan, and the quality of light.
The Rise of LED
Light Emitting Diodes (LEDs) are the clear winner for outdoor lighting today.
- Energy Efficiency: They use significantly less electricity than incandescent or halogen bulbs, which can save you money on your energy bills.
- Lifespan: LEDs last much longer – often tens of thousands of hours. This means fewer bulb changes, which is a big plus for hard-to-reach fixtures.
- Durability: They are more resistant to vibration and shock than traditional bulbs.
- Color Temperature: You can find LEDs in a range of color temperatures (measured in Kelvin, K), from warm white (around 2700K) to cool white (above 4000K). For a porch, a warm white (2700K-3000K) is usually most inviting.
Integrated LED Fixtures
Many modern outdoor lanterns come with integrated LED modules. This means the LED is built into the fixture and isn’t a replaceable bulb.
- Pros: These fixtures are often designed for optimal light diffusion and can be very sleek. They also ensure the LED is properly protected from moisture by the fixture’s design.
- Cons: If the integrated LED module fails after the warranty period, you might have to replace the entire fixture.
Bulb-Based Fixtures (with LED Bulbs)
If you prefer the flexibility of changing bulbs, choose a fixture that takes standard bulbs and ensure you use high-quality LED bulbs, ideally with an outdoor rating.
Installation: Getting Your New Lantern Hung
Once you’ve picked out your perfect waterproof lantern, the next step is getting it installed. This can be a DIY project for those comfortable with electrical work, or you might want to hire an electrician.
DIY Installation: What You Need to Know
If you’re going the DIY route, safety is paramount. Always turn off the power to the circuit you’ll be working on at your main electrical panel before you start.
Tools and Materials
- Screwdriver set
- Wire strippers/cutters
- Pliers
- Voltage tester (essential for confirming power is off)
- Wire nuts (ensure they are the correct size for your wires)
- Silicone sealant (exterior grade, paintable if you plan to paint)
- Ladder
- New waterproof outdoor wall lantern
- Mounting bracket (usually included with the fixture)
- Gloves and safety glasses
The Basic Steps (Consult Your Fixture’s Manual!)
- Turn off power: Locate the breaker for your porch light and switch it off. Use your voltage tester to confirm there’s no power at the existing fixture.
- Remove old fixture: Unscrew the old fixture and carefully disconnect the wiring.
- Install mounting bracket: Attach the new mounting bracket to the junction box on your wall.
- Wire the new fixture: Connect the wires from the new fixture to the corresponding wires from your junction box (usually black to black for hot, white to white for neutral, and green or bare copper for ground). Secure connections with wire nuts.
- Mount the fixture: Carefully position the new lantern over the wiring and secure it to the mounting bracket.
- Seal around the fixture: Apply a bead of silicone sealant around the top and sides of the fixture where it meets the wall to prevent water from seeping behind it. Do not seal the bottom, as this can trap moisture.
- Install bulb (if applicable): Screw in your LED bulb.
- Turn power back on: Return to your electrical panel and switch the breaker back on.
- Test the light: Flip the switch to ensure your new lantern is working.
Important Safety Reminders
- If you’re unsure about any step, stop and call a professional electrician. Electrical work can be dangerous.
- Ensure your junction box is rated for outdoor use. Old boxes might not be weather-sealed.
- Always use wire nuts rated for outdoor or wet locations if recommended by the manufacturer.
Hiring a Professional Electrician: When to Call in the Experts
If you’re not comfortable with electrical work, or if your existing wiring seems old or problematic, hiring an electrician is the safest and most reliable option.
Benefits of Hiring an Electrician
- Expertise and Safety: They have the knowledge and experience to perform the installation safely and correctly, ensuring all local electrical codes are met.
- Troubleshooting: If there are any issues with your existing wiring, an electrician can identify and fix them.
- Efficiency: They can often complete the installation more quickly than a DIYer.
- Peace of Mind: Knowing the job is done right by a professional can save you stress.
What to Expect When Hiring an Electrician
- Get multiple quotes: Contact a few local electricians to compare pricing and availability.
- Check credentials: Ensure they are licensed and insured in your area.
- Discuss your chosen fixture: Be ready to show them the lantern you’ve purchased.
- Ask for a warranty: Inquire about any warranty they offer on their labor.
Lighting Design: Maximizing Your Lantern’s Impact
Simply installing a lantern is a good start, but thinking a bit about how you use the light can make a big difference.
Placement: The Art of Finding the Right Spot
Where you mount your lantern is key to both its functionality and its aesthetic appeal.
Centering and Symmetry
Often, placing a lantern directly in the center of your front door, or symmetrically on either side of it, creates a balanced and inviting look. This is a classic approach that works well for many home styles.
Height Matters
The ideal height can vary, but as a general rule, mount the lantern so the center of the light source is roughly at eye level or slightly above when you’re standing on the porch. This ensures it illuminates the walkway without shining directly into people’s eyes. For a standard door, this might be around 5.5 to 6 feet from the ground.
Avoiding Overlap and Glare
Consider where the light will fall. You want to illuminate the path to your door, not the entire street. Also, try to avoid positioning the light so it causes excessive glare on windows or creates harsh shadows that could be unsettling.
Beam Angle and Light Distribution
Not all lanterns spread light evenly. Some have a very focused beam, while others cast a wider glow.
Downward-Facing Lights
Many modern outdoor wall lanterns are designed to direct light downwards, which is great for illuminating the path and stairs without contributing to light pollution or causing glare. This is often called “dark-sky friendly” lighting.
Frosted or Etched Glass
If you want a softer, more diffused light, look for lanterns with frosted, seeded, or etched glass shades. These scatter the light, reducing harshness and creating a warmer ambiance.
Clear Glass Lanterns
Clear glass offers the most direct light and can showcase the filament of certain LED bulbs if you’re going for a specific vintage look. However, it can also be more prone to glare.
Using Multiple Light Sources (Beyond Just the Wall Lantern)
While your waterproof wall lantern is the star, don’t forget other lighting opportunities on your porch.
Porch Ceiling Lights
If your porch has a solid ceiling, a flush-mount or semi-flush mount fixture can provide excellent ambient light.
Path Lights
For longer driveways or walkways leading to your porch, consider low-level path lights to guide visitors.
Accent Lighting
Small uplights strategically placed near plants or architectural details on your porch can add depth and visual interest.
Smart Controls and Automation
For the ultimate convenience and energy savings, consider smart lighting options.
Motion Sensors
A lantern with a built-in motion sensor (or a separate sensor) will automatically turn on when it detects movement, providing light precisely when and where you need it.
Dimmers
If your fixture and wiring support it, a dimmer switch allows you to adjust the brightness of your lantern. This is great for setting different moods or reducing light when not needed.
Smart Home Integration
Many smart bulbs and fixtures can be controlled via your smartphone app or voice assistants like Alexa or Google Assistant. You can set schedules, create lighting scenes, and even control them remotely. This adds a layer of convenience and can enhance security when you’re away.
Maintenance for Longevity: Keeping Your Investment Shining
A waterproof lantern is built to withstand the elements, but a little regular maintenance will ensure it lasts for years and keeps looking its best.
Regular Cleaning: A Simple but Essential Task
Dirt, dust, pollen, and even bug residue can accumulate on your lantern and detract from its appearance and light output.
What to Use
- Soft cloths: Microfiber cloths are ideal for wiping down surfaces without scratching.
- Mild soap and water: For tougher grime, use a mild dish soap mixed with warm water.
- Gentle brush: A soft-bristled brush can help dislodge debris from crevices.
- Glass cleaner: For glass panes, use a standard glass cleaner.
How to Clean
- Turn off power: Always turn off the power at the breaker before cleaning an electrical fixture.
- Let it cool: If the light has been on, allow the fixture to cool down completely.
- Wipe down the exterior: Use a damp cloth with mild soap and water to wipe down the housing. Rinse with a clean, damp cloth.
- Clean the glass: Spray glass cleaner onto a cloth (not directly onto the fixture) and wipe the glass panes until they are clean and streak-free.
- Dry thoroughly: Use a dry cloth to ensure all surfaces are completely dry, especially around electrical connections.
- Check seals: While cleaning, take a moment to inspect the sealant around the edges of the fixture.
Inspecting for Damage and Wear
Over time, even the best-built fixtures can show signs of wear. Regular inspection can catch small issues before they become big problems.
Checking for Rust and Corrosion
Pay close attention to metal components. If you see any signs of rust or corrosion, address it promptly. For minor surface rust, you might be able to sand it down and touch it up with appropriate metal paint.
Looking at Gaskets and Seals
The rubber or silicone gaskets that create the waterproof seal can degrade over time due to UV exposure. Check them for cracks, tears, or hardening. If they look compromised, you might be able to find replacement gaskets.
Examining the Glass
Chips, cracks, or loose panes in the glass should be addressed immediately to prevent further damage and maintain the fixture’s weather resistance.
Bulb Replacement (When Applicable)
If your lantern uses replaceable bulbs, ensure you’re using the correct type and wattage, and that they are rated for outdoor use if necessary. As mentioned, LEDs are highly recommended for their longevity and efficiency, reducing the frequency of replacements.
Reapplying Sealant
If you notice the silicone sealant around your lantern is cracking, peeling, or has gaps, it’s time to reapply. Old sealant can allow water to get behind the fixture. Gently remove the old sealant, clean the area, and apply a fresh bead of exterior-grade silicone sealant. Remember, don’t seal the bottom.
By taking these simple steps, you can ensure your waterproof outdoor wall lantern remains a bright, welcoming, and safe addition to your home’s exterior for many years to come.